Ditch PhotoMechanic! How to cull in Lightroom Fast
Ok, you guys all know I LOVE Lightroom. I’ve been using it ever since I can remember taking photos. More so than that, I’m a very efficient person. I’m talking to do lists, Google Maps over Apple Maps (because Apple Maps sucks), I’m talking about doing other workouts between my resting sets at the gym – I HATE wasting time. So if when I’m editing, I never want to leave Lightroom. So when the problem with culling in Lightroom became a big issue for me, I set off to figure out the best way to speed up this process in my workflow.
Doing a simple Google search or posting on my favorite photography group, The Rising Tide, about how to fix this issue, most people will say “ You need to download PhotoMechanic!!!” Which I did. I found a discount code, and I purchased it for around $100. Now I’m sure Photomechanic does some great things but for me all it did was cull. $100 is an expensive program just to cull. But again, if it was going to help me save time I will gladly pay $100. After a few months with the program, I have no complaints, other than the plain fact that I had to leave Lightroom. I know I’m picky, but I just want one program that does it all. That was the whole idea of Lightroom in the beginning anyway. Right?
So I did some digging and testing myself to figure out how I could speed up culling in Lightroom, so I didn’t have to Import to Photomechanic, cull, organize, then synchronize that in Lightroom. So here’s what I do and the performance is almost identical to PhotoMechanic. The night of a wedding or the next day I will Import all of our cards at once to Lightroom using our Lexar HR1 Hub card reader. If you don’t have one of these, order one now! It allows me to import up to 4 cards at once.
So here we go! Ready to speed up Lightroom?
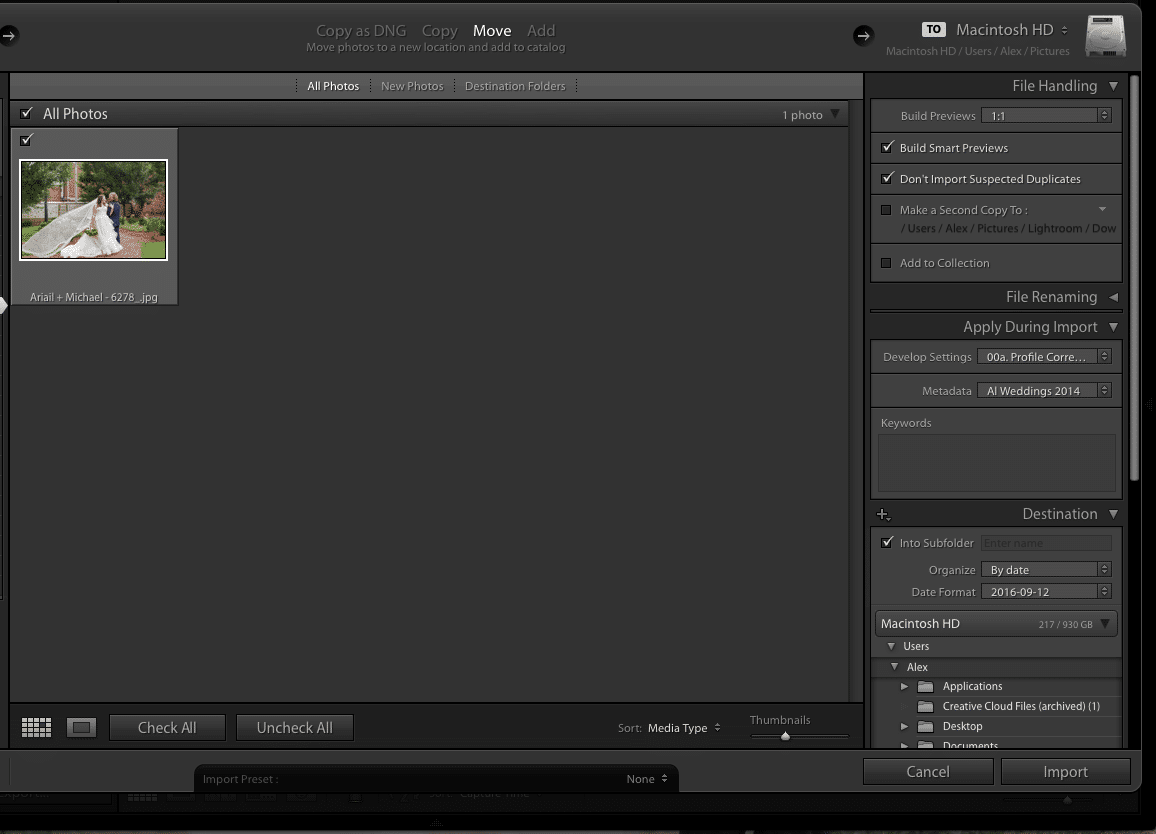
1.In the import pop up. Select all of your photos you want to import. Then click Build Smart PreviewsEXTRA: This is also a good time to build larger previews like 1:1 Previews and add Basic stuff like a develop preset and your copyright. We apply our standard copyright, and an import preset that just applies profile correction. This does add some extra time but again, I do my importing at night when I’m not using my computer.

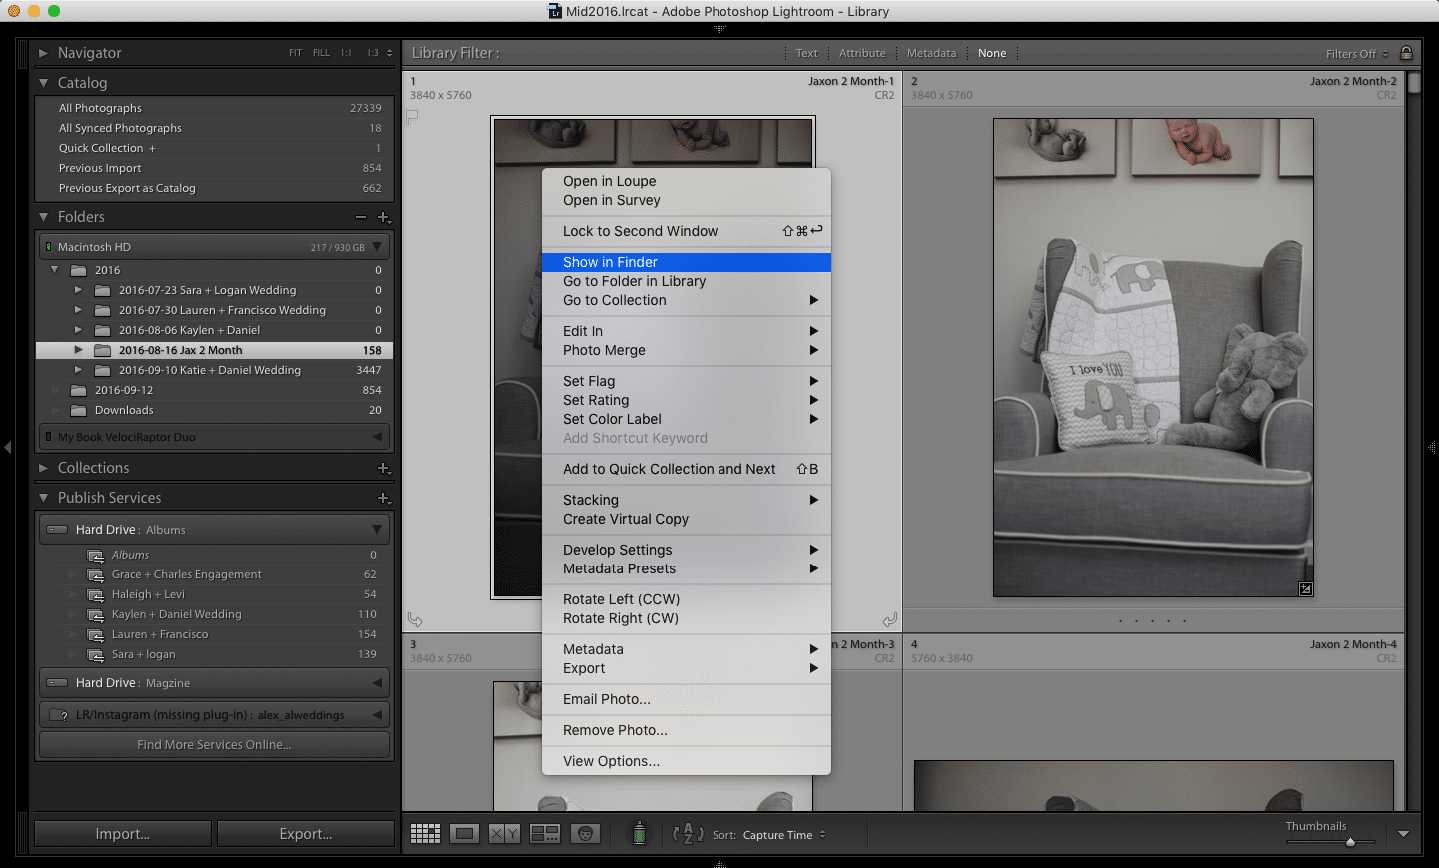
2. After Import go to the folder your just imported while in Lightroom > Right click on any photo inside of that folder > And select “Show in Finder” and simply rename the folder outside of Lightroom. I do this by just adding a dash at the end of the folder name.
This will “hide” the big raw files from Lightroom and force it to you the way smaller Smart Previews.

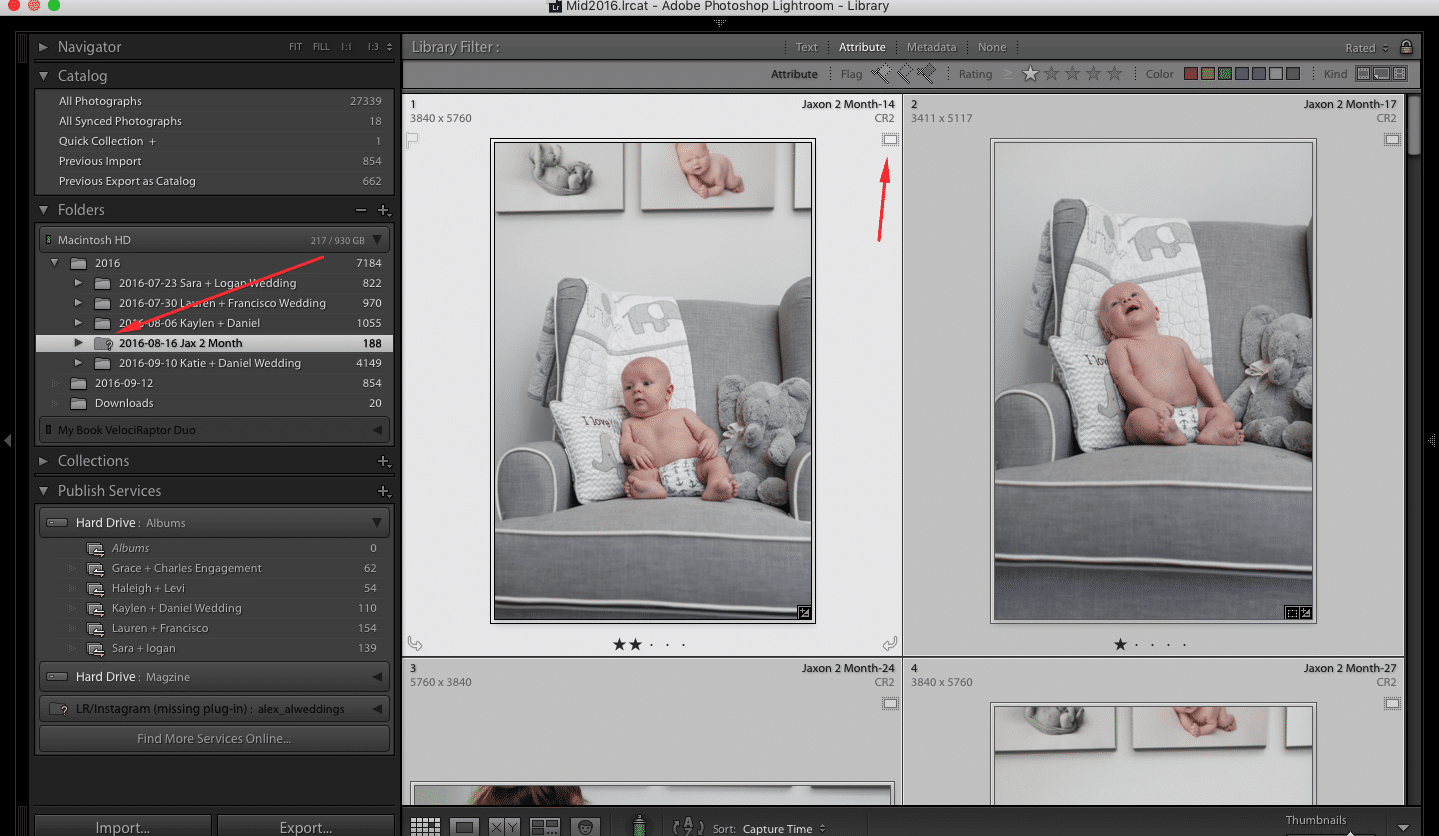
What you’ll notice now when you go back to Lightroom, your folder is greyed out, and the folder has a question mark on it. Don’t freak out. This is right. You’ll also notice that your photos have a little symbol next to the file names. This means that you have done it right, and you are working with the Smart Preview. ↓

THATS IT. You are now free to do anything you would like, just like normal. But you will notice Lightroom is WAY faster. For the nerds like me who want to know whats going on here. It’s simple. When you create those smart previews on import, you’re telling Lightroom to create s smaller size version of the image to work with. The size it produces is around 1707 × 2560px. That’s half the amount of pixels than most cameras. Not only that, you’re not physically reading that large raw file.
For example, 500 RAW files from a 5D MkIII camera may take up about 14 GB of disk space. The Smart Preview files for the same images amounted to 400 MB of disk space.
Now pick your jaw up because this gets even better! You can import your photos onto an external hard drive, build previews, and simply unplug that HD before culling and editing. This lets you skip Step 2 and then you had the added bonus of those files not taking up space on your computer!!!
You’re probably saying, “Stop Alex, I can’t handle all this Awesomeness!” Well, I got one more exciting thing for you. You can keep the Smart Previews forever, and you can go back to old projects and export the file (at 2560px on the long edge)! This is perfect for social media photos!!! It doesn’t get much better than that!
Although Photomechanic is an awesome product, you don’t have to have it. Lightroom will be just fine. JUST REMEMBER! To reconnect those photos before you export the final product. All you do is simply go back into Finder and rename that folder back to its original name. So in our case, we would take out the dash at the end of the name. Magically Lightroom will automatically sync the photos back, and you can export like normal. If you did the external HD trick, all you have to do is just plug your hard drive back in =)
That’s it, friends! ???? Here’s to faster workflow


4 Comments
Hi and thank you for the article. I’m just wondering if the standard sized and the 1:1 previews that get generated during the import have the same effect: Lightroom will use those to display the images, not loading the RAW files, right? And if you want to check for technical flaws like blur in 100% view, a smart preview won’t allow you to do that…
Hey Frank. I believe it will have a similar effect. But from what I’ve seen is actually disconnecting the files. Makes it load faster. 1:1 previews are nice but take time to render and take up extra space on your HD.
and you are correct smart previews wont let you zoom to 100% but I never really need to zoom 100%. Usually an image wont look sharp at 100% you need to look at it from a normal zoom which usually the smart preview size is plenty
This is so legit. #myprayers have been answered! I have 20 weddings to get through. 😀
How do you do a preset for the profile corrections?